You’ve now cut your old jeans to make a sexy upcycled mini skirt, craft supply organizer or I-pod case– what do you do with all those…well, leg scraps laying around? In a few simple and experimental steps you can create this super eco craft hat has double the Earth-loving power: an upcycled denim BYOB (bring your own bag) tote! Not only is a DIY market bag a great way to reuse your old jeans but this crafty shopper will help stop the plastic bag litter that is poisoning ground water and soil. This sassy project deserves twp green stars!
DIY Market Bag
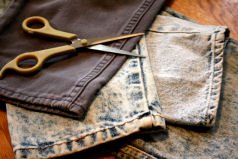
You Will Need:
legs left over from your last denim craft project scissors sewing machine or turn of the century hand sewing skills thread of a fun contrasting color
STEP #1: Choosing – I chose legs from two different stone washed jeans to make subtle contrasting stripes, but you can use any number scrap colors. You can also go for the mono color look, and let the thread be your main contrast. STEP #2: Cutting – Now is the time to lay out those jean legs and cut them open. You will want to save the thick seams for the straps of the bag, so cut directly up the seams on both sides and remove them. Then cut 9 rectangles at 13inch X 5 inch ( you can make them larger or smaller if you’d like to change the size of the bag, as long as every rectangle is the same exact size.) STEP #3: Sewing– This is the fun part, that you can be experimental with! I took this as an opportunity to try out every bizarre stitch on my sewing machine, you know all those stitches that are zig zaggy, wavy and you don’t always know what they are for. I laid each jean strip right edge on top left edge, and then used a new (yet tight) stitch to sew each of the four front panels together. Repeat this step for the back four panels also. All eight stitch lines are totally different and unique, which makes the bag extra attractive. Now you have two pieces (each made of four panels), which you will turn inside out and prepare to sew the left and right sides, leaving the bottom and top completely open. (Kind of like making a pillow.) The one left over panel can now be sewn into the bottom. I put this in by centering the panel in the middle of the front piece and then simply sewing an inner seam by following along the edges (including the sharp turning edges). STEP #4: Finishing Touches – The last of your finishing touches will be the straps and a snazzy decorative item. I turned the seam-line straps with the inside facing out, and placed them on the very inside corners of the bag (right and left) & used a very tight stitch over them. Make sure they are not twisted when you do this (cause that would stink). Now throw this BYOB baby in your wash & dry cycle with your next laundry load and let it make the 80’s fray. For the perfect finishing touch put an old and preferably gaudy broach from the thrift store on it and use as a clasp. Adorable! Now go out and flaunt your DIY market bag at your local grocery store and famer’s market!