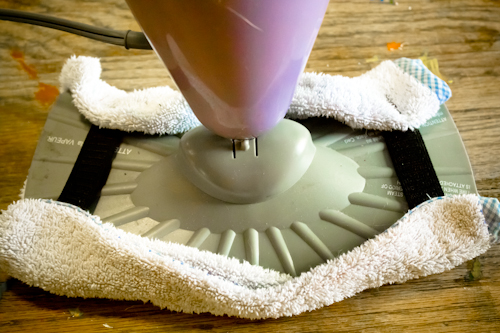
The ease, efficiency, and eco-friendly nature of a steam mop quickly pales when you realize that whichever one you bought, it did not come with enough re-usable mop pads to meet your needs (funny how that works…). Are you going to constantly launder your steam mop pads, buy a ton more of them…or make your own? I recycled old towels for this project, creating mop pads that are made from natural cotton, are easy to wash and sanitize, sew up quickly, and offer customizable thicknesses, so that I can blast my stone-tiled kitchen floor but not trash the wax on my wood living room floor. Here’s exactly how to make your own re-usable steam mop pads: First, you’ll want to measure your steam mop. If the width of the steam mop varies, as mine does, measure the width about one inch in on each side, since this is where you’ll be putting the elastic. Your measurements will be as follows: Length = Actual Length of the Steam Mop + 2″ (for a 1″ overlap on each side) + Your Preferred Seam Allowance for the Raw Edges (You’ll be sewing one end of the mop pad closed, and hemming or binding both edges closed on the other end, or using the towel’s existing hem for this end) Width = Actual Width of the Steam Mop x 2 (because the mop pad will be wrapping around the mop) – 3″(This will give the elastic enough tension to hold the mop pad firmly in place) + Your Preferred Seam Allowance for the Raw Edges Cut two pieces of thick cotton towel at the above measurements for each steam mop pad, ideally placing the existing hem of the towel at one short end on each piece, so that the open end of the mop pad won’t need to be hemmed. Cut two lengths of very sturdy 1″ elastic at 2″ + Preferred Seam Allowance for the Raw Edges in the Width Measurement. Next » Put the two pieces of cotton towel wrong sides together, making sure that, if you’re using the towel’s existing hem for one short edge, the hems are on the same side. If you’re not using an existing hem, hem one short side of each piece prior to this step, then make sure those hemmed ends are on the same side. Measure in 1″ on both sides on one long side of the pieces, then sandwich one end of elastic between the toweling at each of those points. The elastic should be between the two pieces of toweling, extending inwards, with one raw edge of each piece of elastic lined up with the raw edges of the toweling. Pin in place. Sew across this long side of the mop pad, catching the elastic in your stitching (and back-stitching to reinforce it), then sew across the unhemmed short side of the mop pad. Next » Scrunching up the mop pad a bit to make it meet, sandwich the other end of the elastic even with the raw edges of the other long side of the mop pad, taking care to keep the elastic aligned at 1″ in. Pin in place. Sew down this long side of the mop pad, again catching and reinforcing the elastic. The mop pad will be a little scrunched up because of the elastic, so take care not to catch any unwanted fabric in your stitching. Turn the mop pad right side out, and you’ll see that you have a double thickness of toweling, secured into a tube by the elastic, with an open end on one short side. To use the mop pad, stretch it over your steam mop, with the elastic on top. For extra absorbency or to add more layers between the steam and a delicate surface, insert a dishtowel into the pocket formed by one open short side of the mop pad.