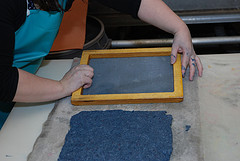
Currently, I’m near the end of a store-bought 18-month planner, which I do love, but it was pricey, AND I had to have it shipped to me, and I’m pretty sure that the pages originally came from somebody’s old-growth forest somewhere–in other words, not ideal. Right now I’m in the process of constructing my own dream DIY planner (more on that later!) from the ground up. It’s going to have room for my weekly schedule, dinner menus, three different kinds of to-do lists, and tear-out pages for shopping lists. It’s also being made completely from recycled and natural materials. Yep, it’s a project! If you liked our tips and tricks for making recycled books from trash, then I think that you’re also going to love these tutorials that I’m also loving lately–five projects for upcycled books that you can make using recycled materials. Check them out, and start planning your own dream planner. This recycled envelope pocket book tutorial from WhipUp shows you how to create a book full of pockets made from upcycled envelopes. I’m incorporating upcycled envelope pockets into my DIY planner so that I can carry things like coupons, stamps, and my business cards. [Image by WhipUp , used with attribution] Next » Although there are lots of ways to upcycle cardboard boxes into book covers, I really love this cardboard box mini book tutorial from Creativity Prompt because the size of the cardboard box that you use is the size of the book–length, width, and depth–that you create. Therefore, if you happen to see a cardboard box that you think would be the perfect size for a book, you can recreate it exactly. [Image by Creativity Prompt, used with attribution] Next » Another timesaving option is to forgo bookbinding completely by upcycling an old book as your base, such as in this altered book tutorial by Jane’s Apron. You can still paste or draw or pin on all the components that you want to use in your book, without the trouble of finding an appropriate cover or sewing in a sturdy binding. On a personal note, I’ve always found that my altered books work best if I choose a very thick book to start with, then tear out half the pages before I begin. What with all the embellishments that I tend to add, this keeps my finished book from becoming so thick as to be unwieldy. [Image by Jane’s Apron, used with attribution] Next » Don’t know what to use for paper? Just use…whatever! This recycled scrap paper notebook tutorial from DesignSponge cleverly incorporates all sorts of previously unloved bits and pieces–leftover graph paper, unwanted maps, unused sides of typing paper, that last bit of wrapping paper, etc. It will certainly add some color, and even an inviting spot to doodle in your otherwise all-business notebook. [Image by DesignSponge, used with attribution] Next » Of course, if you’re really hardcore into bookmaking, then starting from the ground up might mean making your paper by hand. The beauty of this handmade paper tutorial by Wenona Napolitano is that you can incorporate recycled materials, from newspaper to used typing paper to anything that you can get your hands on, right into the paper itself. No to-do lists on old-growth forests for you! [Image by Crafting a Green World, used with attribution]