ReSew is chock full of projects and tutorials on transforming old clothes into something new and exciting. The patterns are fairly easy to follow and customizable. Say you’re not a fan of the embellishments for the Sleeveless V or Sugar Stripes Dress? Simply leave them off! The projects in this book range from easy to hard, and prior working knowledge of a sewing machine is a good thing to have before tackling any of the redesigns. The book also outlines some of the basic techniques and tools you should have in your skill set and supply closet.
Giveaway!
UPDATE: Congratulations to Heatheranne99 who has won! — THIS CONTEST IS NOW CLOSED. Are you ready for the best part? We’re giving away a copy of ReSew to one lucky reader! That’s right, simply leave a comment for us on what you’d use the book for and we’ll choose a winner at random. You have one week to enter and one entry per person.
Felted Basket Tutorial
The other really awesome thing is Jenny has given us this great tutorial to give you a taste of how you can revamp your clothes into something fun and new. So follow along to make this nifty felted basket. Thanks Jenny! Next » This little basket was made from the leftover scraps of two wool sweaters I just couldn’t throw out. The basket is completely hand-sewn; no sewing machine needed! I opted for a solid color on the inside of this basket and a colorful stripe on the outside, but you can choose whatever color combinations you like. You can also make the basket from just one sweater, with the same fabric on the inside and the outside of the basket. To make the basket, here’s what you’ll need:
Two 100% wool sweaters (or just one) Scissors or rotary-cutting equipment A ruler Measuring tape, or rotary ruler Long pins Thick thread or thin yarn to coordinate with your sweaters (I used perle cotton thread) A large-eye needle Sewing thread to coordinate with your sweaters A piece of corrugated cardboard, about 9″ x 9″ Buttons (optional)
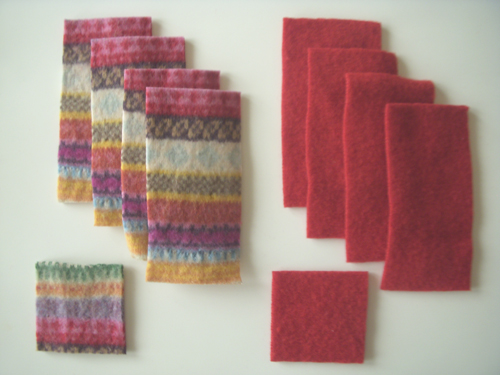
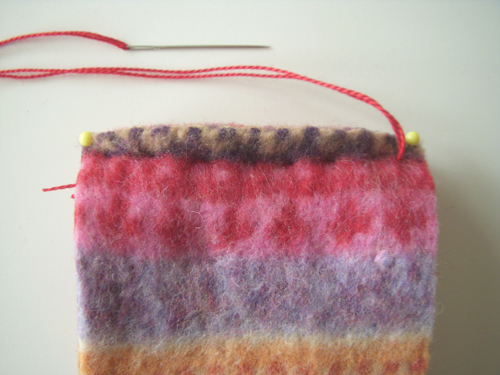
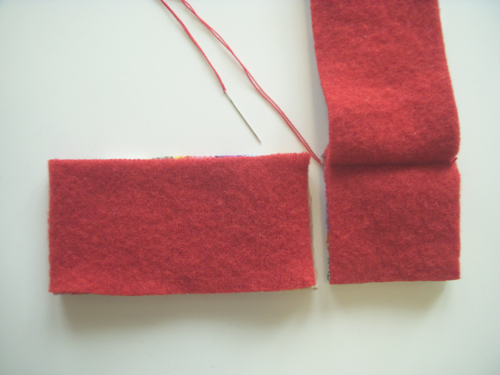
Note: Your wool sweaters need to be “felted” so they won’t fray when cut. To felt a sweater, simply machine wash and dry it, using cycles you would normally use. You may need to wash your sweater more than once for it to fully felt. When you can’t see the stitches in the sweater any longer, you’ll know it’s felted enough to cut into it without any unraveling. Next » From each of the sweaters, cut 1 square, 3 1/2″ x 3 1/2″; and 4 rectangles, 3 1/2″ x 7″. Determine which sweater fabric you would like to show on the outside of the basket and which sweater fabric you would like to show on the inside. Lay one of the outside and one of the inside 3 1/2″ x 7″ rectangles wrong sides together. Lay the two 3 1/2″ squares wrong sides together. Place the square layers on top of the rectangle layers, making sure the pieces that show on the outside of the basket are facing out. Align the edges of the squares with the short sides of the rectangles and pin. Next » Knot a long double strand of perle cotton onto the large-eye needle; hide the knot in between the layers. Starting 1/4″ from a corner, hand sew the four layers together using a running stitch 1/4″ from the edge. Make stitches about 1/4″ in length and about 1/4″ apart. Leave the needle and thread in place; do not knot or cut. Next » Lift the square layers away from the rectangles. Place another set of two rectangles on the square side adjacent to the side you just sewed; make sure the rectangle you want to show on the outside is facing out. Align the square edges with the short sides of the rectangles; pin. Following the same sewing directions above, sew the four layers together. Repeat the same sewing steps on the other two sides of the square. Your basket should now have four sides. Next » Using the same sewing technique described above, pin and sew the four sides of the basket, starting at the bottom of the basket and continuing to the top. When you reach the top of each side, tie off and bury the thread knot in between the sweater-fabric layers. Next » From the cardboard, cut 1 square, 2 3/4″ x 2 3/4″, and 4 rectangles, 2 3/4″ x 5 3/4″. Slide a cardboard rectangle in between the sweater layers on one long side of the basket; repeat for the other three sides. (If your cardboard rectangles are too wide to insert, cut a little strip away from one long edge of the cardboard until the piece fits snugly in between the sweater layers.) Push the cardboard down firmly, until it fits tightly in each bottom corner. Place the cardboard square inside the bottom of the basket; push the corners of the cardboard securely into the corners. Using doubled sewing thread and a whipstitch, sew the tops of the sweater rectangles closed, enclosing the cardboard in between the sweater layers. TIP: Hand-sewing wool with regular thread can be a little tricky; the tiny knot will likely slip right through the wool. Follow these steps for securing your stitches:
- Thread your needle; then knot the two ends of the thread together to form a loop.
- To start a line of stitching, guide the needle through the sweater fabric where you want to begin. Hide the knot in between layers or along the inside edge. Before you pull the knot tightly against the sweater (and it pops right out the other side of the sweater fabric!), thread the needle through the loop of the doubled thread. This will hold the thread in place so you can begin your line of stitching.
- To end a line of stitching, tie a large knot in an inconspicuous place; then take 3-5 tiny stitches over the knot and cut the thread close to the sweater fabric. Okay, let’s finish this basket! Next » You can add buttons wherever you like, or not at all. I liked these buttons off to the side of this basket. When you’ve decided where to place your buttons, tip the basket on its side and sew them onto the basket using your regular sewing thread (see “TIP” above for securing your stitches on wool). You won’t be able to knot your thread on the inside of the basket—your needle will hit the cardboard!—so I hid my thread knots underneath my buttons. I added buttons to the centers of each side on this basket (my trial and error basket). You can vary the sizes of your squares and rectangles to make your basket taller, shorter, wider, or skinnier. Once you’re done, go find something to put in your pretty wool basket and display it for all to see! *** Thanks to Kelly at Crafting a Green World for letting me share this tutorial and for spreading the word about my new book ReSew, which features over 20 cool refashions for secondhand stuff. Good luck with the giveaway, all! ***