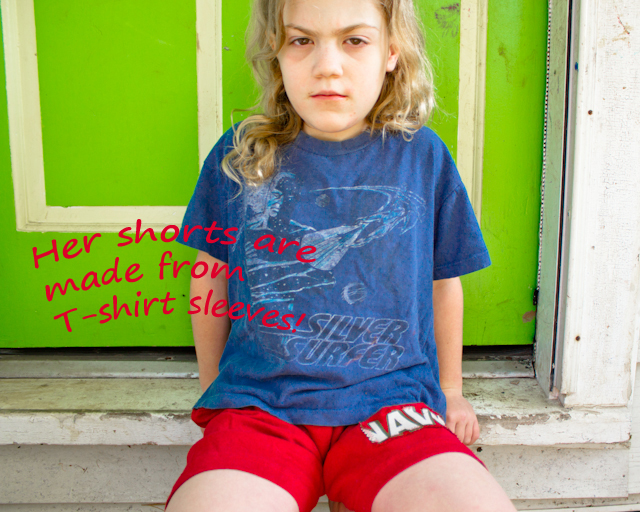
Want to sew clothes for kids that are really, truly cheaper than purchasing them even from your favorite thrift store? Upcycling is ALWAYS the answer. Using one XL T-shirt (total cost: $1, plus tax, from Goodwill), you can sew two pairs of shorts for any size up to your average early-elementary kid. Your kiddo will be so comfy in her soft jersey-knit shorts, she’ll love the awesome appliques taken from the T-shirt’s front, and you will have clothed her quickly and cheaply for the win. Read on for the first tutorial in this two-part series: how to sew your first pair of shorts using the sleeves from your upcycled T-shirt.
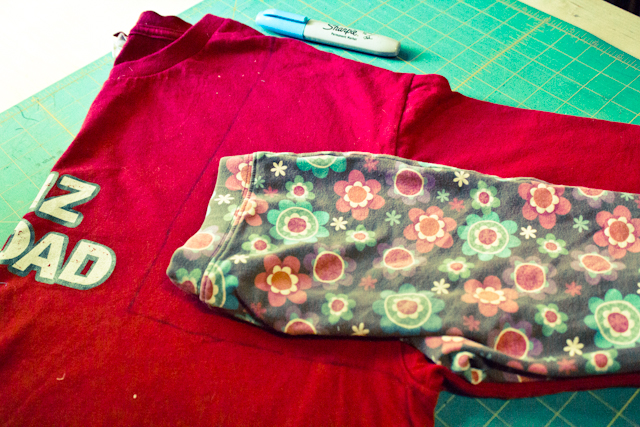
To make these shorts, you’ll be using a well-fitted pair of pants as a template. Iron the pants if needed, then fold them exactly in half, front sides together, and smooth them out. See that sticky-outy part at the butt in the photo above? That’s the crotch curve, and it’s very important. Also iron your upcycled T-shirt until it’s perfectly smooth, and fold it exactly in half, back sides together, taking special care to perfectly match the sleeves and to keep the underarm seams flat. Arrange the pants so that the point of the crotch curve is even with the underarm seam of the sleeve, but is about 1/2″ over onto the sleeve–that 1/2″ is going to be your seam allowance when you sew. Trace the waist of the pants up onto the shoulder of the upcycled shirt, keeping your seam allowance, and add an extra inch or so to the top of the waist so that you can sew a waistband for your shorts. Cut through all layers along your traced lines. Next » Turn one of the sleeves inside-out, then insert the right-side-out sleeve inside this inside-out-sleeve and smooth everything out until both sleeves are identical and even. You’ll see a U-shaped curve that represents the crotch curve from your template. Pin the sleeves together along this curve, and sew using a stitch suitable for jersey knit. Sew again along the bottom of the U using the same stitch–crotch seams get a ton of hard wear, and they’re much easier to sew strongly the first time than to mend later. Straighten out the shorts, removing one shorts leg from inside the other, and you should easily be able to see the shorts’ waist now. Fold the top edge of the waist down about 1″ to the wrong side of the shorts and sew it to form the waistband, leaving a couple of inches unsewn to insert the elastic. Take your child’s waist measurement, and measure out a length of 3/4″ or 1/2″ elastic to exactly that length. Pin a safety pin to one end of the elastic, and use that end to thread the elastic through the waistband. When the elastic is completely inserted, overlap the ends, sew them together very strongly, re-insert them into the waistband, and finish sewing closed that last opening in the waistband. Next » If there’s an interesting graphic on the upcycled T-shirt’s front that you’d like to use, cut it out and applique it directly onto the shorts. The edges won’t ravel, so you don’t have to turn them under or finish the raw edges in any way. As an additional modification, there’s plenty of room in these shorts to slit the side seams and add roomy pockets. Depending on the size of the shirt that you used and the size of your child, you may have had to gather the waist of your shorts in quite a bit with that elastic, since this pattern isn’t modified to be able to trim the waist when cutting the shorts out. Therefore, these shorts may not be super-cute on your kid. They are, however, incredibly comfortable, so they make excellent pajama shorts (without the flame retardant chemicals that you can find in store-bought children’s pajamas), and they’re also the kind of shorts that your kid can wear to get really, really dirty without you having to freak out that your child is wearing their precious handmade shorts in the mud pit. Tomorrow, I’ll be using the body of that same upcycled T-shirt to make a second, legitimately cute, pair of shorts or capris for a kid. Need part two? Check it out right here!