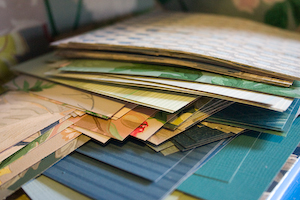
Until I actually tried to work with it. After totally thrashing the cutting mat for my Cricut, I realized that the wallpaper in this particular swatchbook was waaaaay too brittle to do most of the wallpaper craft projects that I’d had in mind. And of course, there’s no point in actually wallpapering with any of the hundred or so 20″x20″ samples. Or is there? Imagine a huge number of wallpaper swatches, all in complementary colors and patterns. Are you imagining what I’m imagining? You betcha! Decoupage! A couple of caveats:
This is a busy look. Busy, busy, busy, busy. It works well, in my opinion, in small spaces, such as the built-in bookshelves in my living room, but if you do it over all the walls in your whole house–well, that’s kind of crazy-looking, but if it’s you, then it’s you. I fully admit that I used Mod Podge, but again, I have an entire dark history of gluing things to my house. I refuse to pander to a future in which I’ll need to explain to a realtor why the seashells glued all over the bathroom doorframe won’t bring the market value of my house down by at least a grand. For you wimps, however, I am quite sure that wallpaper paste is suitably functional, as well.
You will need:
a huge book of wallpaper samples. I like to work out of a single book of samples, because I think the coordinating colors and patterns make the overall work look intentional, not chaotic. self-healing cutting mat, ruler, and a rotary cutter with a blade dedicated to paper work glue (see above caveat)
- You could go a lot of ways here–torn edges, random sizing, decorative scissors–but I chose to cut out all of my wallpaper pieces as rectangles or squares, and I made most of them the same size, around 6″x6″.
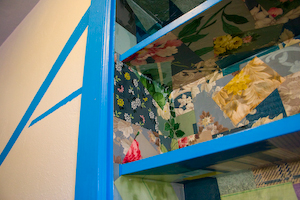
- You could also choose from an infinite number of patterns or themes or color schemes, but the paint in my living room is blue, so I chose wallpaper swatches from the blues, and I divided them up–two shelves done in floral papers, and two shelves done in non-florals.
- After you choose your space, follow the instructions on your container of glue to decoupage your wallpaper pieces to your wall. Because I used Mod Podge (I know!), I brushed several layers over the top of all my surfaces to seal it, and I still may cut some glass to line the bottom of each shelf. NOTE: If you’re covering a space like a built-in bookshelf, it’s really important to line your edges up neatly–it just makes the project look better. I did all my outside edges and corners first, then went crazy with the centers. I might have gotten a little high on the Mod Podge, but still–I think it looks cool. Haven’t you ever done anything weird to your house?

title: “Tutorial Small Space Vintage Wallpaper Collage " ShowToc: true date: “2025-06-11” author: “Mercedes Bekerman”
Until I actually tried to work with it. After totally thrashing the cutting mat for my Cricut, I realized that the wallpaper in this particular swatchbook was waaaaay too brittle to do most of the wallpaper craft projects that I’d had in mind. And of course, there’s no point in actually wallpapering with any of the hundred or so 20″x20″ samples. Or is there? Imagine a huge number of wallpaper swatches, all in complementary colors and patterns. Are you imagining what I’m imagining? You betcha! Decoupage! A couple of caveats:
This is a busy look. Busy, busy, busy, busy. It works well, in my opinion, in small spaces, such as the built-in bookshelves in my living room, but if you do it over all the walls in your whole house–well, that’s kind of crazy-looking, but if it’s you, then it’s you. I fully admit that I used Mod Podge, but again, I have an entire dark history of gluing things to my house. I refuse to pander to a future in which I’ll need to explain to a realtor why the seashells glued all over the bathroom doorframe won’t bring the market value of my house down by at least a grand. For you wimps, however, I am quite sure that wallpaper paste is suitably functional, as well.
You will need:
a huge book of wallpaper samples. I like to work out of a single book of samples, because I think the coordinating colors and patterns make the overall work look intentional, not chaotic. self-healing cutting mat, ruler, and a rotary cutter with a blade dedicated to paper work glue (see above caveat)
- You could go a lot of ways here–torn edges, random sizing, decorative scissors–but I chose to cut out all of my wallpaper pieces as rectangles or squares, and I made most of them the same size, around 6″x6″.
- You could also choose from an infinite number of patterns or themes or color schemes, but the paint in my living room is blue, so I chose wallpaper swatches from the blues, and I divided them up–two shelves done in floral papers, and two shelves done in non-florals.
- After you choose your space, follow the instructions on your container of glue to decoupage your wallpaper pieces to your wall. Because I used Mod Podge (I know!), I brushed several layers over the top of all my surfaces to seal it, and I still may cut some glass to line the bottom of each shelf. NOTE: If you’re covering a space like a built-in bookshelf, it’s really important to line your edges up neatly–it just makes the project look better. I did all my outside edges and corners first, then went crazy with the centers. I might have gotten a little high on the Mod Podge, but still–I think it looks cool. Haven’t you ever done anything weird to your house?
